Forget the complexity of data management. Snowflake’s bulk loading automatically ingests a lot of your data fast. Just upload files to Snowflake’s high-speed stages. Then load to tables instantly with one click. No coding needed.
This guide introduces a streamlined approach to bulk loading data directly from your local system into Snowflake.
Snowflake handles petabytes with ease. Learn how to efficiently transfer massive volumes of data using Snowflake’s internal stages, simplifying the data handling process.
Say goodbye to data bottlenecks. Load data, gain insights – all in seconds. Let us begin.
Data loading is the process of transferring data from various sources into a data storage system, such as a database or data warehouse. It is a fundamental step in data management and analysis.
Efficient data loading is crucial for organizations aiming to make informed decisions, extract valuable insights, and gain a competitive edge. It ensures that data is readily available for analytics, reporting, and business intelligence.
Bulk data loading is ideal for transferring large volumes of data efficiently. It is well-suited for historical data migration, batch processing, and data warehousing. Key features include parallel data loading, support for various data formats, and error handling.
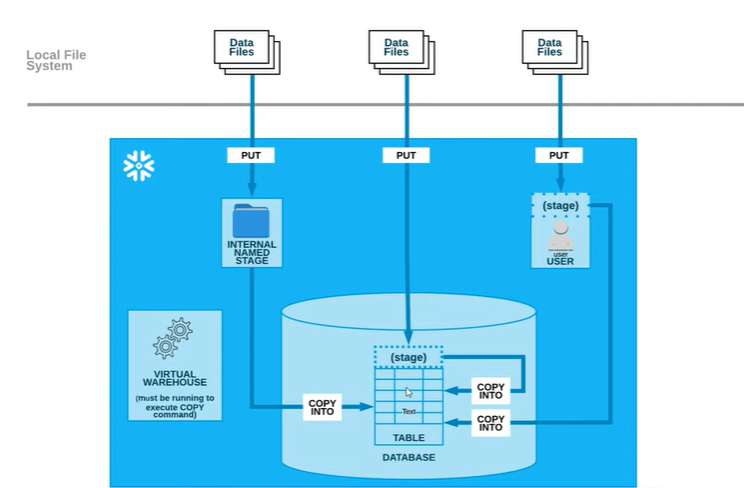
In Snowflake, the bulk load process is a method for efficiently loading large volumes of data into Snowflake tables. A Snowflake stage is a location, either within Snowflake or in a cloud storage service like Amazon S3 or Azure Blob Storage, where you can store your data files before loading them into Snowflake tables. Stages simplify data loading and provide flexibility in managing your data files.
Snowflake Internal Stage: This is the default stage type provided by Snowflake. It is managed by Snowflake and is ideal for most use cases. Snowflake manages the storage and access control for these stages, so you don’t need to worry about configuring storage or access permissions. You can create internal stages at the account, database, or schema level. You can load data into Snowflake from these stages using the COPY INTO command.
Snowflake External Stage: An external stage is a storage location that you define outside of Snowflake, typically on an object store like Amazon S3, Google Cloud Storage, or Azure Blob Storage. You need to create an external stage in Snowflake and provide the necessary credentials and location details to access the data in the object store. External stages are useful when you want to load data from or unload data to cloud-based storage systems.
The choice of using an internal or external stage depends on your specific use case and where your data is located. If your data is already in a supported cloud storage service, an external stage may be more convenient. However, if you want Snowflake to manage the storage and access control, you can use internal stages.
Internal stages are storage locations within Snowflake used for uploading, unloading, and managing data. They provide a way to store data temporarily before loading it into a Snowflake table or exporting it from a table. Snowflake supports three primary types of internal stages.
User Stages:
A User Stage is a type of internal stage associated with a specific user’s session in Snowflake. Each user has their own User Stage, and it’s created automatically when the user logs into Snowflake. User Stages are ideal for temporary data storage and are frequently used for one-time data loading and unloading tasks.
Table Stages:
Table Stages are a type of internal stage associated with a specific table within a Snowflake database. They are created automatically when you create a table and are used for storing data temporarily related to that table.
Named Internal Stages:
Named Internal Stages, also known as Named Stages, are internal storage locations managed by Snowflake. These stages are user-defined and are not specific to a particular user or table. Named Stages are suitable for more general data storage and can be accessed by multiple users and sessions.
Loading data from an internal stage in Snowflake using Snow SQL is a common operation for ingesting data into Snowflake tables. Snow SQL is the command-line client for Snowflake that allows you to execute SQL commands and interact with Snowflake services. In this demonstration, we’ll cover the steps for loading data from an internal stage.
The diagram below will provide a better understanding of all internal storage types: user stages, table stages, and named internal stages.
Loading data from an internal stage in Snowflake using Snow SQL is a common operation for ingesting data into Snowflake tables. Snow SQL is the command-line client for Snowflake that allows you to execute SQL commands and interact with Snowflake services.
Download and Install Snow SQL from below link.
To log in to Snowflake from the SnowSQL client in the command prompt, you can use the following code with the account ID, region, and username in the correct format.
snowsql -a <account_identifier> -u <user_name>
For Example:
![]()
In the example above:
Let’s utilize all three types of stages in Snowflake (User Stage, Table Stage, and Named Internal Stage) through Snow SQL in the command prompt to load a file from your local machine.
User Stages:
put file://C:\Users\chinna.obulesu\Documents\snowflakefiles\customer_data3.csv @~/staged ;
Run this code in command prompt.

This code is using the PUT command in Snowflake to upload a file named “customer_data.csv” from local machine to a User Stage in Snowflake.
PUT: This is the Snowflake command used for uploading a file.
file://C:\Users\chinna.obulesu\Documents\snowflakefiles\customer_data3.csv: This part specifies the full path to the local file you want to upload. In this case, the file is located on your local machine at the specified path. Make sure the file exists at this location.
@~/staged: This part specifies the target stage in Snowflake where you want to upload the file. In this code, @~/staged denotes the current user’s User Stage. Specifically, the file “customer_data.csv” will be uploaded to the “staged” subdirectory within the User Stage.
So, when you execute this command, it uploads the file “customer_data.csv” from your local machine to your User Stage in Snowflake, making it available for further data operations within your Snowflake session.
You can use the LIST command in Snowflake to view the list of files in a specific stage, including your uploaded files. To list the files in your User Stage, you can use the following command:
LIST @~/staged;

Table Stages:
put file://C:\Users\chinna.obulesu\Documents\snowflakefiles\customer_data4.csv @%customer_data;
Run this code in command prompt.

This code is using the PUT command in Snowflake to upload a file named “customer_data.csv” from local machine to a User Stage in Snowflake.
PUT: This is the Snowflake command used to upload a file.
file://C:\Users\chinna.obulesu\Documents\snowflakefiles\customer_data4.csv: This part specifies the full path to the local file you want to upload. It points to “customer_data.csv,” which is located on your local machine at the specified path.
@%customer_data: This part specifies the target stage in Snowflake where you want to upload the file. In this code, @%customer_data represents a Table Stage named “%customer_data.”
NOTE: The reason we created the table before uploading the file is that Snowflake’s Table Stage is associated with a specific table. To load data from a file into a table using a Table Stage, you need to ensure that the table exists before the data upload. This ensures that the data structure in the file matches the structure of the target table. In this case, you created the “customer_data” table first to ensure that the file can be loaded into that table without any issues.
After executing the PUT command, the file “customer_data.csv” will be uploaded to the Table Stage “%customer_data,” and it can be used to load data into the “customer_data” table or perform other data operations within the context of that table.
To list the files in your Table Stage, you can use the following command:
LIST @%customer_data;

Named Internal Stages:
put file://C:\Users\chinna.obulesu\Documents\snowflakefiles\customer_data5.csv @my_database.internal_stages.named_customer_stage;
Run this code in command prompt.

This code is using the PUT command in Snowflake to upload a file named “customer_data.csv” from your local machine to a Named Stage in Snowflake.
PUT: This is the Snowflake command used to upload a file.
file://C:\Users\chinna.obulesu\Documents\snowflakefiles\customer_data5.csv: This part specifies the full path to the local file you want to upload. It points to “customer_data.csv,” which is located on your local machine at the specified path.
@my_database.internal_stages.named_customer_stage: This part specifies the target Named Internal Stage in Snowflake where you want to upload the file. In this code, it specifies:
Note: when you use the PUT command to upload a file, you need to specify a Named Stage as the destination for that file. This Named Stage must be pre-created, following the database, schema, and stage hierarchy in Snowflake. Without a valid Named Stage, the code will not have a target location for the file upload, and it will fail.
To list the files in your Named Stage, you can use the following command:
list @my_database.internal_stages.named_customer_stage;

Loading with COPY Command
User Stage:
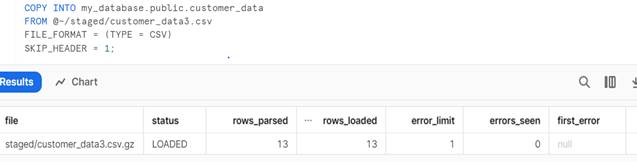
COPY INTO my_database.public.customer_data
FROM @~/staged/customer_data3.csv
FILE_FORMAT = (TYPE = CSV)
SKIP_HEADER = 1;
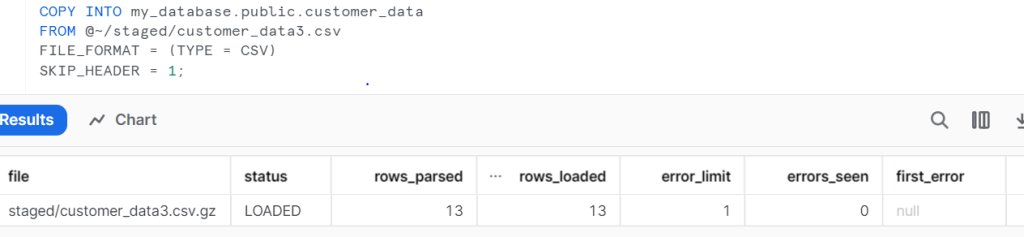
The provided command is a Snowflake SQL statement that copies data from a specified file in a User Stage to a Snowflake table. It also includes the “SKIP HEADER” option to skip the first row in the CSV file, which is commonly used for column headers.
Table Stage:
COPY INTO my_database.public.customer_data
FROM @%customer_data/customer_data4.csv
FILE_FORMAT = (TYPE = CSV);
 :
:
The provided command is a Snowflake SQL statement that copies data from a specified file in a Table Stage to a Snowflake table.
Named Internal Stages:
COPY INTO customer_data
FROM @my_database.internal_stages.named_customer_stage/customer_data5.csv
FILE_FORMAT = (TYPE = CSV);
You can execute this code either in the Snowflake web user interface (UI) or by using SnowSQL in the command prompt.

The provided command is a Snowflake SQL statement that copies data from a specified file in a Named Internal Stage to a Snowflake table.
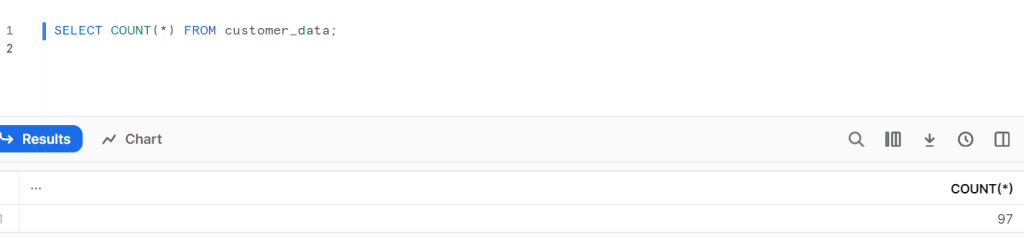
After loading data from various files into the “customer_data” table using different stages, we can now check the row count in the “customer_data” table.
Certainly, you can load various file formats, including JSON, into different stages in Snowflake.
https://docs.snowflake.com/en/user-guide/data-load-local-file-system