Simple Guide to Dynamics 365 Business Central Integration
We know you’re looking for a way to connect Dynamics 365 Business Central with other apps, especially Dynamics 365 Sales (formerly Dynamics 365 Customer Engagement), and other apps you might use. This guide is for Business Central users like us who need to set up and manage these connections.
Why Connect Business Central with Dynamics 365?
Connecting Business Central with other Dynamics 365 apps helps us all:
- Get Better Data
- Work Easier
- Save Money
- Make Customers Happier
- Sell More Easily
- Help Teams Work Together
- Get Cheaper Licenses
- Add Features
- Fill in Missing Pieces
- Automate Things
- See More Clearly
- Spend Better
- Close Books Faster
How to Connect: Our Choices for Dynamics 365 Business Central CRM Integration
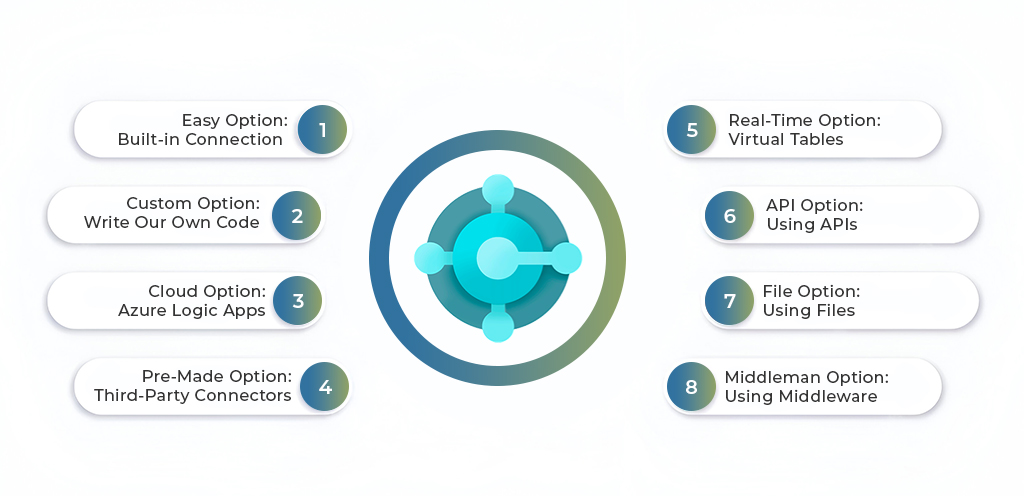 There are a few ways to connect Business Central with Dynamics 365. The best way depends on what we need, our skills, and our budget.
Easy Option: Built-in Connection (using Dataverse)
- What it is: The simplest way, using Microsoft’s tools. It uses the Business Central/Dataverse connector.
- How it Works: Business Central connects to Dataverse, which is like a central place for data. Dynamics 365 Sales (and other Customer Engagement apps) also connect to Dataverse. This lets us move data between Business Central and Sales.
This is a common way to do dynamics 365 business central crm integration.
- Good for: Simple connections with standard Business Central and Dynamics 365 Sales setups.
- Pros: Cheap, easy to set up.
- Cons: Not much customization. Might not work for complex setups or custom fields.
– Setup:
- Connect Business Central to Dataverse.
- Connect Business Central to Dynamics 365 Sales.
- Set up data moving, including what to move and which way it goes.
Custom Option: Write Our Own Code
- What it is: Writing our own code to connect Business Central with Dynamics 365 apps.
- How it Works: Uses Business Central APIs (OData, SOAP) and Dynamics 365 APIs to share data and start actions.
- Good for: Very specific needs that other methods can’t handle.
- Pros: Lots of flexibility.
- Cons: Takes a lot of coding and expertise. Can be expensive and take a long time.
Cloud Option: Azure Logic Apps
- What it is: A cloud service that lets us create automated workflows to connect Business Central with Dynamics 365 and other apps.
- How it Works: Uses pre-built connectors for Business Central and Dynamics 365 to share data and start actions. It has a visual designer to create workflows.
- Good for: Complex connections that need custom logic and data changes.
- Pros: Flexible, scalable, and affordable.
- Cons: Needs some tech skills to set up and maintain.
Pre-Made Option: Third-Party Connectors
- What it is: Ready-made connectors from other companies that make connecting easier.
- How it Works: These connectors give us an easy way to match data and set up syncing.
- Good for: Specific connection needs, like connecting to e-commerce sites.
- Pros: Faster setup, less coding.
- Cons: Can be pricey. Not much customization.
Real-Time Option: Virtual Tables
- What it is: Lets us see data from Business Central in Dynamics 365 Sales (and other Dataverse places) without copying the data.
- How it Works: Virtual Tables create a “virtual” view of Business Central tables in Dataverse. We can see and use this data right away.
- Good for: When we need to see Business Central data in Dynamics 365 Sales without syncing it.
- Pros: Real-time data, no data copying.
- Cons: Can’t write data back easily. Can be slow.
API Option: Using APIs
- What it is: Using APIs (Application Programming Interfaces) to let apps talk to each other.
- How it Works: Business Central APIs (V2.0) create “Connect apps” between Business Central and other software, using standard Rest APIs to share data.
- Good for: Connecting Business Central with different software.
- Pros: Easy data sharing, real-time syncing (sometimes).
- Cons: Needs tech skills in API development. We have to follow Microsoft’s API rules.
File Option: Using Files
- What it is: Matching fields between apps and using CSV files to move data.
- How it Works: Data is taken from one system, put into a flat file (like CSV), and then put into the other system.
- Good for: Batch processing, like paying suppliers.
- Pros: Simple for basic data moving.
- Cons: Not for real-time syncing. Needs careful data matching.
Middleman Option: Using Middleware
- What it is: Using middleware platforms to connect many apps with Business Central.
- How it Works: Middleware apps (like Zapier, Celigo, Pipedream) act as connection points, giving us tools to share data and automate workflows.
- Good for: Connecting lots of apps to Business Central, especially when we need to change data or use complex logic.
- Pros: Flexible, scalable, and often has ready-made connectors for popular apps.
- Cons: We need to know the middleware platform. Can add extra cost and complexity.
Things to Consider Before Connecting
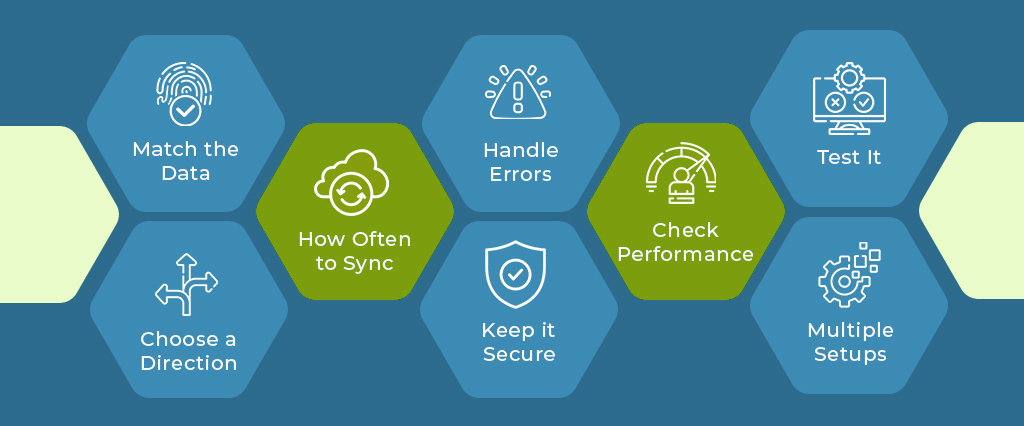
- Match the Data
- Choose a Direction
- How Often to Sync
- Handle Errors
- Keep it Secure
- Check Performance
- Test It
- Multiple Setups
Let’s break that down:
- Match the Data: Decide how data will match up between Business Central and Dynamics 365. Know which fields go together and how the data will change.
- Choose a Direction: Choose which way the data will move. Will it go from Business Central to Dynamics 365, the other way, or both ways?
- How Often to Sync: How often will data sync? Real-time syncing gives us the latest info, but it can use a lot of resources. Scheduled syncing might be better for less important data.
- Handle Errors: Have a way to find and fix data syncing errors.
- Keep it Secure: Make sure the connection is secure and data is protected.
- Check Performance: Watch how the connection is working to make sure it doesn’t slow things down.
- Test It: Test the connection to make sure it works and data syncs correctly.
- Multiple Setups: If we have different setups (like Development, QA, Production), plan how we’ll set up, test, and use the connection in each one.
Standard Sales Data Mapping
When we connect with Dynamics 365 Sales, Business Central has standard ways to match data:
business central integration with dynamics 365 sales means:
Dynamics 365 Sales Account ➔ Business Central Customer
Dynamics 365 Sales Contact ➔ Business Central Contact
Dynamics 365 Sales Opportunity ➔ Business Central Opportunity
Dynamics 365 Sales Order ➔ Business Central Sales Order
We can change these mappings if we need to.
How to Connect Business Central and Dynamics 365 Sales: Step-by-Step
This shows us how to set up the easy, built-in connection between Business Central and Dynamics 365 Sales.
What We Need:
- A Dynamics 365 Business Central license.
- A Dynamics 365 Sales license.
- Admin rights in both Business Central and Dynamics 365 Sales.
- A Dataverse environment.
Steps:
- Connect Business Central to Dataverse
- Turn on the Dynamics 365 Sales Connection
- Set Up Data Syncing
- Turn on Sync Jobs
- Test the Connection
- (Optional) Make it Better with Power Automate
Here’s a closer look:
1. Connect Business Central to Dataverse:
- In Business Central, search for “Dynamics 365 Connection Setup” and open it.
- Pick “Connect to Microsoft Dataverse.”
- Follow the instructions to connect to our Dataverse. We might need our Dynamics 365 Sales login.
2. Turn on the Dynamics 365 Sales Connection:
- In the “Dynamics 365 Connection Setup” page, turn on the “Dynamics 365 Sales Connection.”
3. Set Up Data Syncing:
- In the “Dynamics 365 Connection Setup” page, check the standard table mappings.
- Change the table mappings if we need to.
- Choose which way the data syncs for each table.
- Add any rules for changing the data.
4. Turn on Sync Jobs:
- Business Central uses jobs to sync data with Dynamics 365 Sales.
- Make sure the right sync jobs are turned on. Search for “Job Queue Entries” in Business Central to find them.
- Schedule the sync jobs to run when we want.
5. Test the Connection:
- Create a new account in Dynamics 365 Sales and make sure it shows up as a customer in Business Central.
- Create a new customer in Business Central and make sure it shows up as an account in Dynamics 365 Sales.
- Test syncing other things, like contacts, opportunities, and sales orders.
6. (Optional) Make it Better with Power Automate:
- Use Power Automate to create custom workflows to add more features to the connection.
- For example, we can make a flow that automatically creates a job in Business Central from a quote in Dynamics 365 Sales.
How to Set Up Business Central Integration: More Details
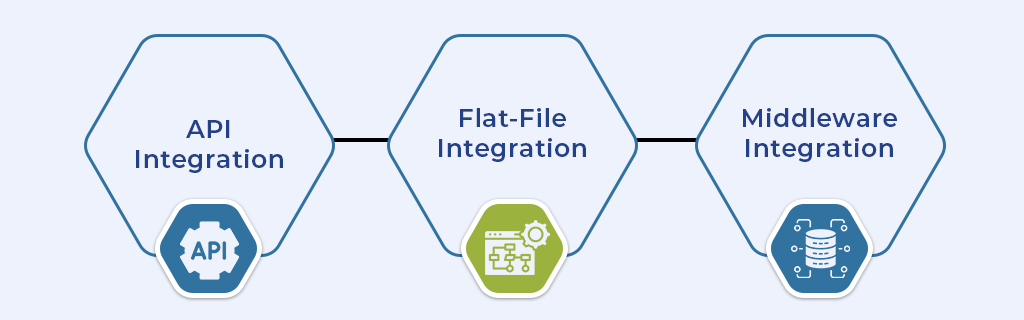
This section gives us more detailed steps for each way to connect.
1. API Integration
Step 1: Learn About Business Central APIs: Get to know the Business Central APIs (V2.0). Microsoft has info on these APIs, including how to log in and what the data looks like.
Step 2: Pick an API Client: Choose an API client tool that works with our setup (like .NET, Python, JavaScript). This tool will handle the requests for talking to the Business Central API.
Step 3: Log In: Set up the right way to log in. Business Central usually uses OAuth 2.0. We’ll need to register our app in Azure Active Directory and get a client ID and secret.
Step 4: Write the Code: Write the code to use the Business Central API. This code will:
-Create API requests (like getting data, creating records, updating records).
-Handle API responses (like reading JSON data, handling errors).
-Change the data if needed.
Step 5: Test: Test the API integration to make sure data is being shared correctly and errors are handled well.
Step 6: Deploy: Put the API integration on a server (like Azure Functions, a web server).
2. Flat-File Integration
Step 1: Map the Data: Create a document that shows how each field in Business Central matches a field in the other app.
Step 2: Get the Data Out: Take the data from Business Central and put it into a flat file (like CSV). We can use Business Central’s export features or create a custom report.
Step 3: Change the Data: If needed, change the data to match what the other app needs. This might mean cleaning up the data or changing the format.
Step 4: Put the Data In: Put the flat file into the other app. The app should have a way to import data from flat files.
Step 5: Handle Errors: Have a way to find and fix any problems during the data import.
Step 6: Schedule It: Set up the data export and import to run automatically.
3. Middleware Integration
Step 1: Pick a Platform: Choose a middleware platform that works with Business Central (like Zapier, Celigo, Pipedream). Think about cost, features, how easy it is to use, and if it has pre-built connectors.
Step 2: Connect to Business Central: Set up the middleware platform to connect to our Business Central. We’ll need to give it our Business Central login and let it access our data.
Step 3: Create Flows: Use the platform’s designer to create flows that show how data will be shared between Business Central and other apps.
Step 4: Map the Fields: Match the data fields between Business Central and the other apps. The platform should have an easy way to do this.
Step 5: Test the Flows: Test the flows to make sure data is being shared correctly and errors are handled well.
Step 6: Deploy and Watch: Put the flows on the platform and watch how they’re working.
Top Integrations for Business Central
Here are some popular integrations for different kinds of apps:
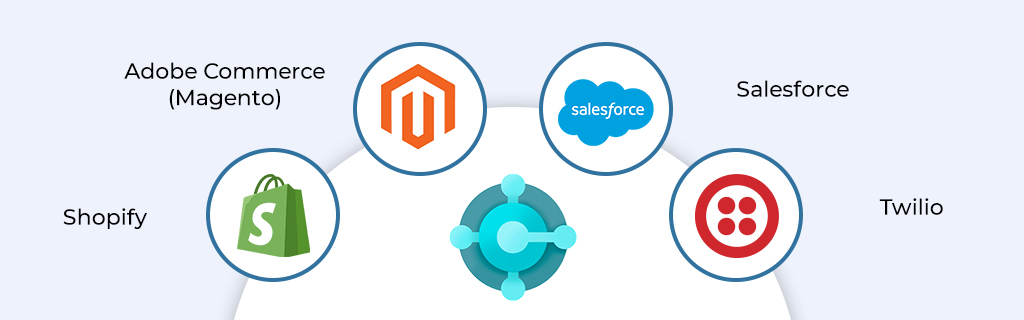
- Shopify
- Adobe Commerce (Magento)
- Salesforce
- Twilio
Tips for Success
- Know What We Want
- Ask People
- Pick the Right Way
- Make a Plan
- Start Small
- Watch It
- Train People
- Get Help
- Check Them Out
- Test Everything
Fixing Problems
- Data Sync Errors
- Slow Performance
- Connection Issues
- Login Problems
- API Errors
- Flat-File Errors
- Middleware Errors
What to do:
- Data Sync Errors: Check the logs for error messages. Make sure the data mappings are right and the data is valid.
- Slow Performance: Watch the connection and find any bottlenecks. Change the data mappings and sync frequency.
- Connection Issues: Make sure Business Central and Dynamics 365 Sales can connect. Check the network and firewall settings.
- Login Problems: Make sure the user accounts have the right permissions.
- API Errors: Look at Microsoft’s API documentation for help.
- Flat-File Errors: Check the flat file format and data types. Make sure the data mapping is right.
- Middleware Errors: Look at the middleware platform’s documentation.
In Conclusion
Connecting Dynamics 365 Business Central with Dynamics 365 Sales and other apps can really help our business and make customers happier. Plan carefully, choose the right way to connect, and follow best practices. Keep watching the connection and fix any problems to keep data moving smoothly. This guide helps us understand dynamics 365 business central integration and how it can help our business, especially the business central integration with dynamics 365 sales and dynamics 365 business central integration with customer engagement. We hope this helps you on your integration journey!